Tuesday, November 13, 2012

Honey Harvest

Nothing on this earth can compare to the aroma of honey. Sweet and heady with a slight spicy note, it fills the air in the apiary come August. The combs are full of ripe nectar, capped and prepared for winter when the honey bees will tap into this sustaining liquid gold.


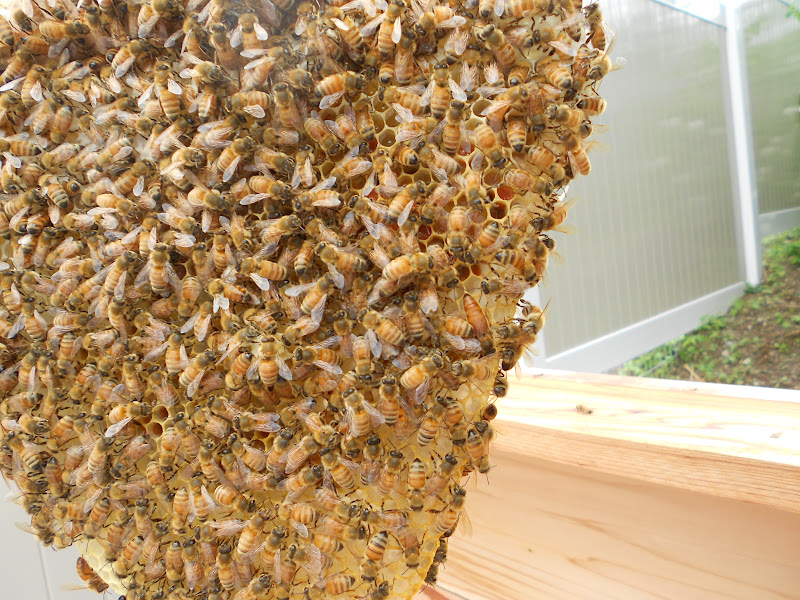
My harvest was small this year, only four combs, but the honey was dark and rich late season nectar flow from blackberry and knotweed. Because I keep Top Bar hives the comb is cut from the bars using a sharp knife leaving behind a wax "guide" for the new combs that will be built this coming spring. Any errant combs veering from a straight path will be cleaned up as to avoid any cross combing when the building begins again.


With natural comb the crush and strain method is used unless you are using a Langstroth hive (the typical square box hive) with the foundationless method where instead of using pre-formed wax foundation sheets you allow the bees to fill in the frames with natural comb. In this case you can still use an extractor which uses centrifugal force to spin the honey out of it's cells. 


The capped honey is referred to as "ripe". The uncapped cells are in the process of dehumidification to around 17- 18% which the bees know and then cap the cell to prevent the honey from absorbing any more moisture. Unripe honey will ferment essentially becoming mead. The worker bees will keep the hive around 92 degrees by flapping there wings, this warm air movement dries out the honey and once it reaches the perfect stage the cell is capped. Honey is hygroscopic so it is important to store honey in airtight containers so that it will not absorb the moisture in the air. If you find your honey crystallizing this is what is happening. You can bring your honey back to a liquid form by gently heating it but this will destroy many of it's inherent beneficial properties. The best thing to do with your crystallized honey is to make Creamed Honey with it.

Creamed Honey recipe:

3 cups liquid honey
1/3 cup crystallized honey
Use an electric mixer to combine the two honeys completely until the mixture has no tongue detectable crystals. Bottle the honey immediately in a one piece lidded jar (not a cap and ring), place the jar upside down for two hours to allow any trapped air to rise to the bottom of the jar. Then flip the jar over and one large air bubble will rise to the top of the jar leaving your creamed honey with a smooth surface. Now store the jar in in a cool room (55 degrees) undisturbed for one week or until the honey has solidified. Tilt the jar a little, if the honey moves it is not set. It is possible to make flavored creamed honey as well using fruit, herbs, and spices. How about jalapeno, rosemary, or lemon? Just be careful not to bring the moisture level of the honey above 18%. Using powders or freeze dried fruits (powdered) will keep you safe without resorting to a refractometer.
Creamed honey is a wonderful spread for muffins, toast, or meats!


The crush and strain method is just what it sounds like. Place a large colander over a deep bowl or food grade bucket and crush the comb with a potato masher. The honey will drain through the colander slowly. I stirred the mixture a few times to help the process along. After an hour all that remained was the wax.


To process the wax I used a simple water method. I placed extra comb and crushed comb into a large aluminum pot then poured near boiling water over the top to cover and float the wax. I then heated the pot to near boiling so the wax separated from the cocoons and the cocoons started to float. And here I will divert into a side note for those of you wondering about the cocoons. When the queen lays an egg into a cell it develops into a larvae which in turns spins a cocoon as it goes through metamorphosis, similarly to a butterfly. When the baby bee emerges it leaves behind on the cell wall it's cocoon. The nurse bee then cleans and polishes the cocoon lined cell with wax and a piece of propolis. This ensures the cell is now sanitary for the next egg. There may be hundreds of eggs laid in that cell per rearing season. Once rearing is done most of these cells are filled with honey or pollen for winter stores. This is why new comb is pure white and old comb is dark brown. It is essential for the health of the colony for the beekeeper to rotate out the brood comb regularly as the cells become smaller and smaller. Old comb also creates an invitation to the wax moth larvae who thrive on old comb. In the wild the wax moth is natures way of ridding feral hives of old comb as the larvae cannot digest new comb but a managed hive should try it's best to be wax moth free. So to get the nice white comb back the wax needs to be rendered from the cocoons and other contaminates. 


Stirring the wax/water mixture insures that all the wax is melted. Then the mixture is poured through a sieve or mesh screen into a clean bucket. The cocoons are left in the sieve, the water and wax are in the bucket. I let this cool and then lifted the now solidified round disk of wax off the water. This process can be repeated using finer and finer filters to further clean the wax.


I wanted to try preserving some comb honey as well. I cut out two small squares of capped honey and then poured some liquid honey over that. I think it looks rather pretty although a lighter colored honey say from maple nectar would make it much more dramatic. Maybe some decorative jars too? All comb honey should be put into the freezer to kill any wax moth larvae that may be present. If this step is skipped you might open up a jar to find little creatures a crawlin'! This is why taking comb honey from nice new white comb is best!


Honey is at it's best taken from a treatment free hive (no chemicals or antibiotics used to treat bee diseases and pests), non-filtered nor heat treated. Honey is naturally free from bad bacteria. It is anti-fungal, antibacterial, and a natural antibiotic. It is used for stomach ailments such as ulcers and is used on open wounds. It has been found to heal faster with less scaring on open wounds and acne. It has also been found that consuming local honey (never feed honey to children under the age of 1year) can lessen the effects of pollen allergies and build immunity.

Eat honey, my son, for it is good; honey from the comb is sweet to your taste. Proverbs 24:13


Friday, October 5, 2012

Lavender Harvest

My favorite use for lavender is making jelly. Intensely aromatic and mildly flavored it graces biscuits, scones and shortbread elegantly. Nothing can compare!

"Hanged up in houses,
it doth very well attemper the aire,
coole and make the place to delight
and comfort of such as are within."
~John Gerard, 1597~


Lavender has been used for centuries for it's aromatic and culinary benefits so it makes sense to include this herb in your urban homestead plan. Not only is it useful to humans but the bees love it too. This is why I decided to install 25 plants (three different varieties) near my hives. I chose the English Lavender 'Sachet' for it's excellent oil quality to use in sachets for the dryer and potpourri. It was developed in Oregon so it is a good choice for my growing zone. 


I also planted the French lavender 'Provence'. It will tolerate damp soil well and will be used for making Herbs de Provence, jelly, cookies and other sweets as it is not as spicy as other lavenders. Also, with it's extremely long stems it is ideal for cutting.


The third variety I chose was Lavandula x intermedia 'Fred Boutin' for it's lovely grey green foliage and because it flowers late in the summer and into fall giving my bees a little snack before settling into the hive for winter. It also keeps it's color well when dried and has long, slender stems for crafting.

Lavender needs sun and sandy well drained soil. Humidity and wet soils rather than cold will be the death of it. Do plenty of research before choosing a variety and planting area to insure a long lived, thriving plant. The larger varieties can be pruned by as much as one-third in springtime and the smaller varieties only a few inches. Shape into mounds keeping pruning methods in mind as you harvest. Lavenders that flower in the early spring and are harvested may have a bonus rebloom in late summer. 

When choosing varieties for your landscape consider site, bloom time (aiming for successive bloom times), and intended uses. Following these guidelines will help you have a successful lavender garden! 

Thursday, August 23, 2012

4th Quarter Report - Slightly Late!

Oh my! What a summer this has been! All I can say is that I have so much material and no time (or energy) to actually lay it out for all to see. For that, I am sorry, but long winter nights are on their way and there will be plenty of time in front of the fire...

The most important lesson I have learned through the last 16 months is that homesteading is a committed lifestyle. It is not for wimps! Or for that matter travelers, or households where everyone has a job outside the home, or families who have a myriad of other interest.  Caring for a thriving homestead is a job and a half. No wonder the settlers were in such good physical shape...and died early. All kidding aside, homesteading is demanding to say the least but has many rewards along the way. 

Once we got comfortable with the honey bees and planted the cool weather crops we headed to the Mother Earth News Fair in Puyallup Washington. There we fell in love with Alpacas, learned to build an Earth Oven, bought some lovely vanilla fig balsamic vinegar from Leonardo e Roberto's, and explored ideas presented by green companies large and small.


I've played soccer for 21 years and gave it up this year to take up cycling. One ride we took this summer was through the Eola-Amity Hills AVA in Oregon. The area is a rural playground with farm fresh everything! We stopped at the McMinnville farmers market to purchase ingredients for a homemade dinner and ate one night at Recipe, in Newberg. Truly fantastic.

A Neighborhood Kitchen
A chicken tractor at the McMinnville farmers market


In the spring we made some lovely Salmonberry jam from foraged berries...


...and are now reaping the benefits of seed potatoes.


I used a compost bin with removable panels to access the potatoes at different points during the season.


We had plenty of baby and fully grown potatoes and some still in the bin. Also, our snap peas were extremely prolific and long lasting with the mild weather.


As for the rest of the garden, well, let's just say I had a lot of fun cycling and traveling! I will be sowing more cool weather vegetables for a late fall harvest.

In conclusion, I have determined that building a viable urban homestead takes more than one year or even two for the average, active, working family. So, relax, take it slow. My expectations were a wee bit too aggressive. There were so many projects I wanted to tackle. Looks like I'll be working till the snow comes!


Monday, June 4, 2012

Bee Witched


It's been a full month since the installation of our bee packages and those little beauties have been...well...busy as a bee. The Lower hive jumped into production straight out of the gate where the Upper hive was slow going. Within two weeks the Lower hive had five bars built out and every stage of brood, from egg to capped. On inspection of the Upper hive I could not find any sign of egg or brood but was able to locate the queen so three days later I went in for another inspection. What I found were two supersedure cells. These are enlarged cells built on the face of the comb to rear a new queen. This is determined by the worker bees when they deem the reigning queen is insufficient in some way. What this tells me is that the existing queen was laying because you need an egg to make a bee. So I believe that she must have been laying sporadically and not near enough to make the workers feel as though the hive was growing properly. 


The supersedure cell in located just left of center on the upper part of the comb. There was another on the other side of this comb as well. As the beekeeper I had to make a decision on what action, if any, I should take. Because my queen was guaranteed to be of high quality I could go back to the vendor and get a new queen. This would involve locating the original queen, disposing of her and the two supersedure cells and their contents then introducing the new replacement queen to the hive. Or I could trust the bees and let nature take it's course. This early in the season the hive would have plenty of time to catch up IF all went well. For all to go well one virgin queen would emerge and kill the other two queens, the one in the other supersedure cell and the original queen. She would then, on a warm rainless day, take a mating flight and hopefully mate with multiple drones from another hive. All of this would take up to 30 days. It wasn't long before the decision was made for me. When I made the call to take delivery of a replacement queen I found that they were fresh out and wouldn't get a delivery for 15 days! So, I left for a week vacation and let the bees take care of themselves! I would like to say that I didn't worry, I did, and had a few nightmares about it too. I had some peace knowing that my son would be checking in on them and updating me.


When I returned from vacation the supercedure cells were gone so I set about finding the new queen. I was unable to so I waited a few weeks and made another inspection and sure enough I spotted her. Can you? She's the large dark orange bee on the right hand side of the comb about half way down. Whew! Now to make sure she has mated. There was a problem. I could not find any eggs so I decided to wait and make another inspection in another week. Thankfully we had some nice weather, perfect for mating. Also on this comb you can see the pollen stores. Those dark colored cells where the workers are making bee bread.

Let's take a look at the Lower hive's progress.
This is a brood comb. Most the cells have hatched and will be cleaned for the queen to lay another egg inside. On the bottom you can see capped brood that are getting ready to emerge. The flatter ones will be female workers the domed ones will be drones. If you look closely you will spot a larvae which will be enclosed soon to go through it's metamorphosis. It is located just right of the queens bottom in the patch of capped brood nearest the center of the comb. The queen in this hive is it's original and is marked with a small yellow dot on her thorax. Another way to identify her is that she is a solid color not striped.


This comb is basically a drone nursery. All those fat little drones lined up are waiting for the female workers to feed them and clean their cells. The workers have helped them emerge by tearing open their cells, then cleaning them and feeding them their first meal. Females are not so lucky. The female bee fights her own way out of her cell and then is expected to clean it get some food for herself and then start caring for larvae. Although not everything is known about the role of the drone in the hive, the two things we do know is that they eat and mate. The queen decides how many workers and how many drones to lay for a balanced hive. These drones will mate with a queen from another hive for diverse genetics.

This hive was going strong but due to the fast growth started to run low on honey and pollen stores so I've decided to keep feeding them sugar syrup until the blackberry nectar flow starts in June.

Conclusion to the Upper hive story.

I was getting very worried about the Upper hive as on another inspection two more supercedure cells were being made. Again, this means there were eggs so the new queen had mated. What was the problem then? Well it seems that, as in all endeavors, we may not have all the details. I had decided to get on with helping this hive so I again called the vendor to get a replacement queen. As I was explaining the problem Quinten (a seasoned beekeeper) told me that sometimes workers will do this as a precautionary measure and that I needed to look inside the cell to see, if indeed, there was an occupant. If not, no worries. A small piece of information I would have liked to have known. Also, I would need to destroy the queen and the cells before coming to get the replacement so I was sure she would be the only queen in the hive. Okay. The morning before I was to get the replacement I went in search of my queen. At first I couldn't find her but alas there she was and in the process of laying like a champ.


And here she is laying with all of her attendants in a circle around her. She laid three eggs in a matter of seconds and can lay up to 2,000 eggs a day! I was so happy to see her active so I decided not to get a replacement and check inside the supersedure cell. I located it on a comb heavy with honey. As I started to lift the comb out I banged it slightly and the whole comb broke from the bar and dropped to the bottom of the hive. My heart dropped too! I was glad that I had read about other beekeepers doing this and knew exactly what to do. Leave it alone. The bees will clean it up and in two days they had put everything back in order, the supercedure cell being destroyed in the process. So much bee drama!

Here is a lovely capped honey comb in pure white wax. The hives are perfumed by it and it floats through the warm breeze near them. On a sunny day I love to sit and watch the bees coming and going and listen to the hum of their wings. I am bewitched by this creature!

Friday, May 18, 2012

Introducing Honey Bees into a Top Bar Hive


After bees are placed in their hives they go about setting up house. Attendants tend to releasing the queen and making sure she is fed. Workers start building comb to house the new brood the queen will lay, the flying bees will collect honey and pollen to be stored in the comb as well. These will be the bees food stores and if we are blessed they will make enough for them and us! 

Natural unprocessed honey is a superfood known to aid in digestive problems, wound healing, and general health. Honey contains antioxidants (the darker the honey the more it contains), is anti-microbial, anti-bacterial and anti-viral. It can be used topically to heal wounds. This is why honey has been used as a face mask to help heal acne. It is reported that a diet containing local honey can assist in deterring allergies to local plant pollen. Honey should not be given to children under 1 year of age.

Bees use pollen to make "bee bread". Using the same bacteria used to make some cheeses, the bees ferment the pollen and use it for food. It is made up of 55% carbohydrates, 35% proteins, 3% minerals and vitamins, 2% fatty acids, and 5%, 188 types of fungi and 29 types of bacteria (the good kind!) Bee bread is the honey bees main supply of protein. Many people use bee pollen as a daily supplement. 

Propolis is a resinous substance that bees make from the sticky coating of tree leaf buds, sap and other sticky plant secretions. The bees gather the substance then fortify the hive with it making the hive more stable, to reduce vibration, and for general hive health since it is anti-bacterial. If, for some reason, a small animal was to get into and die in the hive and it was too big for the bees to carry out, they would encase the carcass in propolis to prevent rotting and disease. The propolis also water and pest proofs the hive. Humans use propolis for its reported health benefits such as an anti-inflammatory, to treat viral diseases, ulcers, heart disease and to boost the immune system. 

Bees are fascinating creatures and provide us so many benefits. I can't wait until mine make enough products to share with me. In the meantime I'll try my best to see that they are getting everything they need to excel.

Next post will be pictures and narrative on my growing hives.

Thanks for stopping by!

Saturday, April 14, 2012

Preparing For the Honey Bees!

The tests have been taken, the books have been read, the ground has been prepared, and the hives have been put in place. All we need are the honey bees.


For the past few months I've been preparing my hives and the space in my yard that they will sit. I used an orange oil/beeswax product to seal the outer wood against rain even though they are made of cedar. I like the look of the natural wood and didn't want them to grey. I didn't paint them because I didn't want to create another chore for myself. 


I've located and prepared the optimal space in my backyard for my hives. Honey bees keep their hives at an even temperature, around 93 degrees. They do this in winter by huddling together around the brood and shivering. Those around the outside edge shift into the middle when they get cold. Very similar to the Emperor Penguin. In summer, worker bees continually fan their wings to keep the air circulating and the hive vented of extreme temperatures. The space I've chosen for my bees receives morning sun to help warm the hive and get the bees moving (they won't fly under temperatures of 50 degrees). The sun hits the hives again during mid-day and then receives shade in the late afternoon until a few hours before sunset when the sun hitting the hive will give warmth before the cool night air moves in. In this way I hope to assist the bees with the management of their hive in making their work lighter. 


Another reason I chose this space is because it is protected from wind both in summer and winter. The only other requirement is that the space be level. Which as you can see I had to modify. So with some leftover base gravel and stone from another project I fashioned lovely platforms. The reason why you need level hives is so that the comb will hang straight off the bar. More on that in my next beekeeping blog post.

You can see that I had plenty of help on this project! The chickens had a heyday eating all the unearthed worms and bugs. 
The hive entrances face away from each other and the viewing windows both face each other so I don't have to move around too much while observing inside the hive. The whole idea of natural beekeeping is to be the least invasive to the hive as possible hence the viewing window. You can see what's going on in the hive without even opening it! (This is not the case with other hive design types) The hive roof rotates up from the window side so there is no lifting involved.


Placing the hives near a fence insures that the bees will fly up and over any nearby human traffic areas. Before the bees arrive the area will be planted with different types of lavender and the Magnolia tree in the left of the picture will be moved. A gravel path will be laid for access to the hives.


I love the tilt-up lid. That means I don't have to lift it off like other hive designs! The viewing window lets me observe the bees anytime without opening the hive and exposing the brood to varying temperatures. The three holes with screen mesh are for ventilation. If the bees do not want them they will fill them with propolis, an orange caulk-like substance that they make and use to caulk holes and cracks within the hive that they deem unnecessary.


I want my hives to be beautiful so I paid a little extra to have the roof covered in copper and I installed pretty garden themed tiles to the fronts.


 These hives were bought from http://www.beethinking.com/ in Oregon. If you are handy and have the time, making your own is a snap. You can find simple instructions at http://www.biobees.com/build-a-beehive-free-plans.php along with other great information on natural top bar hive beekeeping.

My bee packages come on April 25th. Soon after I will be posting a video of me installing the package into the hive. Check back the first part of May to view this riveting procedure!


Tuesday, April 10, 2012

Make Your Own Cheese

Through the past two year we've been making different cheeses each of which need to age for longer periods of time. This past weekend we finally got to open the Parmesan! A momentous occasion as it has been being babied for eighteen months in our cellar cupboard. 


The texture was perfect. It was hard, dry, not too salty, and best of all buttery.


One of the first cheeses we made was Manchego.
Our Manchego was soft and creamy textured, aged for one year. Not sure why I don't have any pictures of it opened up...it must not have have lasted very long! It was aged for one year.

This cheddar was aged for only 9 months. To make it "sharp" it needs to age longer.
We added annatto for coloring which gave us this yellow hue.

This was delectable Camembert! Paired with a whole grain, hot from the oven bread, it was gone in a minute!
Close-up of rind.


Close-up of texture.
A challenging cheese to make, Camembert ages for little time, 6 weeks, but can become too ripe quickly. We had a batch go south on us turning to a melted mush.

For inspiration and great instruction look for "Artisan Cheese Making at Home by Mary Karlin http://www.artisancheesemakingathome.com/ and "Home Cheese Making" by Ricki Carroll http://www.cheesemaking.com/


Wednesday, February 22, 2012

Planning A Four-Season Vegetable Garden

Sorry folks! I hope you weren't too excited to see how to build a cold frame. I know I promised to post it this time but it's going to have to wait. Why? Because I read a book and was so inspired that I had to post this information instead. Not to worry though, I will be posting the how-to in Fall. I think we'll be able to get by with simple row covers till then!

Here in the Pacific Northwest our climate is temperate maritime. This means that our weather is moderated by our proximity to the Pacific Ocean, and specifically Puget Sound. These climates have a narrow range of temperatures without extremes which allows the opportunity to grow vegetables year-round, many with little winter protection. Take for instance the lowly brussel sprout shown below in early summer. The sprouts mature from the bottom leaves of the stock which is where you will harvest first. As the plant grows it produces more leaves which in turn produces more sprouts. As you harvest throughout the summer and fall the energy of the plant is concentrated into new production. Since the plant is cold hardy the fruit will continue to grow so you still have sprouts to harvest through the frost, sleet, and snow of winter with no protection for the plant. Snow cover will simply insulate the plant.


My final harvest of the season was the first week of February. The plants themselves took a beating but the sprouts were fantastic! The cold weather brought out the sweetness and because many were still young they were nice and tender. Some were the size of peas, others were the size of large marbles.


Sauteed in butter with a dash of sea salt and pepper brings out the sweetness. So delicious! Don't even try to compare these to what you get at the supermarket.


One sprout contains 37% of your daily vitamin K and 22% of your daily vitamin C (plus other good stuff!). 


Many crops can be overwintered with simple row covers, mulches or cold frames. In this way cold hardy vegetables can be sown in late summer for harvest during winter months. By giving carrots, beets, parsnips, rutabagas and leeks a little mulch you'll harvest them all winter. With the large amount of winter rain we get in the PNW a good choice would be raised beds or containers placed in a sheltered position so root vegetables won't rot. 

There are many leafy vegetables that will overwinter with a little protection as well. With these you'll want to use row covers, cold frames or cloches, keeping rain, frost, and wind at bay. Spinach, chard, arugula, cress and lettuces to name a few. Kale needs no protection and can grow right along side your brussel sprouts! Below are my cold hardy plantings for late winter plus overwintered rainbow chard. The row covers can warm the soil a full hardiness zone higher therefore coaxing the seeds into germination. Once germinated and the danger of frost past (about March 21st) the row covers can be removed.


This chart produced by Travis Saling will help you get started. http://westsidegardener.com/quick/winter_veggies.html

PlantSowing dateHardy toNotes
ArugulaAugust 15-September 1515F/-9CHolds up reasonably well to rain
BeetsBest in July 1-10, will work if sown until the 20th20F/-7CCan go colder with mulch
Broccolifall/winterAnytime in June25F/-4C (?)Rain will probably kill it before the frost does
overwinteredJuly 15-August 110F/-12Cthese are the biennial sprouting broccolis
Brussels SproutsMay 150F/-16CSeriously, these taste nothing like the store-bought ones
Cabbage (for winter)June 15F/-14C (hardiest varieties)I haven't grown the spring cabbages like First Early Market, so I really don't know the timing
CarrotsJuly 1-15th15F/-9CWith mulch, these can be depended on to overwinter. An August 1st sowing still give useable, but smaller, roots. With carrots there seems to be big differences that are just related to how particular varieties grow as the days get shorter.
Cauliflowerfall/winterJune 1-3025F/-4C (?)Rain and slugs tend to do mine in before the cold does
overwinteredJuly 15-August 15F/-15CTakes soggy soil somewhat better than sprouting broccoli
ChardUp until early August20F/-7CEven if the plant dies back, often the crown survives to regrow in the Spring
Claytonia/Miner's LettuceAugust 10-25At least 11F/-12CFast growing, compact, does well under cover
Corn Salad/MacheAugust 20-September 1At least 8F/-13CSeems to thrive unprotected in our rainy wet winters
Cress, Garden (Upland)By late AugustAt least 15F/-9CBiennial plants can be started as early as late spring
Escarole/EndiveAugust 1-10Reportedly 5F/-15CGood cloche candidate, since wetness is more of a problem than cold. Bitterness decreases with frost, and varies from variety to variety.
FavasSeptember,October10F/-12CI sow in late September. I've gotten away with sowing them in November; they will grow a little even in winter, during any spells when temps are above freezing!
KaleJuly 1-15At least 8F/-13CNeeds no protection
KohlrabiJuly 10-2015F/-9CCan go lower with mulch or under cover
GarlicSeptember,OctoberAt least 8F/-13CI plant in late September. Basically, if the ground isn't frozen, you can put them in.
LeeksApril-Early MayAt least 8F/-13CBig differences between varieties in terms of hardiness and bolting date. This entry reflects my experiences with Durabel.
LettuceAugust 1-1024F/-4CAnother good cloche candidate
MinutinaAugust 10-25~ 15F/-10CUnusual, almost succulent leaves
MustardJuly 15-August 1015F/-9CHardiness is variable, depending on variety
OnionsMost typesAugust 100F/-18CMost overwintered onions dry down in June. Waterlogged winter soils can be a problem for all overwintered onions
Walla Walla sweetSeptember 1-15Reportedly -10F/-24CWalla Wallas dry down in July.
ScallionsJune-SeptemberAt least 10F/-12CThis applies to Allium cepa types of scallions. A. fistulosum types are much hardier and non-bulbing, but also are less tender and hotter in flavor.
ParsnipJune 15 - July 1At least 8F/-13CIt's fun trying to keep these seeds damp until they sprout!
RadicchioJuly 15Reportedly 5F/-15CLeaf types are easier and more reliable. Don't dawdle in sowing this one!
RadishesThrough SeptemberUncertainVarious rots and soil dwellers spoil mine by midwinter, even though the plants are still alive
SpinachAugust 1-15At least 8F/-13CUnder a cloche they can be depended on to overwinter


My peas, planted February 8th, are just starting to sprout under the row covers. The minimum soil temperature for germination is 40 degrees. That means the row cover has kept the soil temperature high enough to promote germination. Once peas are sprouted they can withstand frost so the row cover can be removed and a trellis put in place.

I was inspired by a book I just read by Eliot Coleman "Four-Season Harvest." Eliot and his wife live in Harborside, Maine where they tend a year-round organic farm. The book is laced with tidbits from their travels to France where they researched winter edibles. Maine lies on the same parallel as the south of France where winter vegetables have been harvested for centuries. The practice of winter harvesting goes beyond the tended vegetable garden into the fields and forests as foragers gather native winter edible greens. Here in the PNW these might include miners' lettuce, young dandelion, and fiddle head ferns. To get more specific, Seattle, Washington lies on the 47th parallel north which corresponds with Nantes, France at the outlet of the Loire river valley. It is famous for growing Muscadet grape. Because these areas have been inhabited for centuries longer that the United States there is much gardening wisdom to be learned by researching the local fare as Eliot and Barbara did.

My next post will begin a series on creating your own backyard apiary.

Friday, January 27, 2012

Seeds - Ordering, Sowing, Gathering, Saving

January! Fire blazing, stack of seed catalogs, and my computer buzzing away with photos of the top new varieties for 2012. It's a gardener's rite of passage to an overflowing bed of delectable eatables by August. Then in September and October as some plants are left to go to seed, they are collected, culled through, and the prime ones put up for the following Spring. But Wait...there's more...


Just a few generations ago the Farmer was intimately involved in building and maintaining plant genetic health but today he has been relegated to an "end-user". The Farmer's direct relationship with the plant propagated diversity of our domesticated plant genetics. But today, new technology, breeding methods, and the consolidation of seed companies has all led to erosion of the plant genetic materials and now threatens biodiversity. This is why I support organic heirloom seeds and tend to shun hybrid ones. What's the difference? Saved Hybrid seeds are often sterile or do not reproduce true to the parent plant. What you get may be inedible. Heirloom seeds will reproduce the parent.
Another fly-in-the-ointment are those plants that are "open pollinated". These plants include squash, cucumbers, melon, parsley, cabbage, chard, broccoli, mustard greens, celery, spinach, cauliflower, kale, radish, beets, onion, and basil. They cross pollinate with others within their family and maintaining the original plant in a small garden is nearly impossible. So, what seeds can you save with confidence that you can grow the same plant next year? Organic heirloom seeds are the best choice for the casual gardener. Seed saving is a bit of a science but if you want to get educated on the subject you can follow this link to the Organic Seed Alliance located in Washington. Access the free download "A Seed Saving Guide for Gardeners and Farmers" http://www.seedalliance.org/Publications/

My first attempt at saving seed. This is fennel seed. It self sows abundantly so I don't think I'll have any issues with my saved seed.
Grass roots seed saving is a country wide phenomenon. There are many seed companies out there and surely one close to your community. Buy seed from farms and granges in your community. They will offer varieties that have been tested in and produce best for your climate.

Next time: Building and Using a Cold Frame