Monday, December 12, 2011

Of Guns, Birds, and Dogs

 The Bird Dog. An essential to the hunting life. 

My husband finds hunting to be relaxing and fulfills his desire to provide meat for our table. In my opinion, hunting is a skill everyone should posses.


Pheasant, Chukar, Quail, and wild Turkey are some of the birds we hunt and eat. Mammals include Elk and deer. Plentiful and organic, we use as much of the animal as possible and leave the rest to be cleaned up by other animals.


Grilled pheasant, foraged Chanterelles, garden basil and tomatoes with homemade fresh mozzarella. If you thought homesteading meant boring food you have much to learn. You find satisfaction and confidence when you sit down to a plate of self provided foods. You know its history and that it's fresh, safe, and not lacking in nutrients.


As for me, hunting does not carry the same intrigue as my husband, but I enjoy shooting shotgun at the range. I especially love Sporting Clays as it mimics the sport of hunting...you just don't have to kill anything! Because I don't take my gun to "the field" I bought a lovely Beretta 687 Diamond Pigeon. I feel good knowing that if need be I could actually bring down a bird for dinner.


If you live around the Puget Sound area check out Seattle Skeet and Trap Club. Annual memberships are very affordable and they offer a youth program.

Thursday, November 17, 2011

Potato Harvest


Is your urban lot plagued with shade from neighboring trees? Mine is and due to this I decided to grow my potatoes in containers placed where the sun shines most. It worked out so well that I will continue to grow them this way.


This summer I only potted up two pots but next year I plan to do larger pots and more of them. All  you need are seed potatoes available at the local grange or nursery or you can mail order them from seed catalogs. Store the potatoes in the refrigerator taking them out about a week before planting time. Place them in a warm bright window to break their dormancy. Potatoes like cool weather and can be planted 2 weeks before the last anticipated frost for your area. Cut the seed potatoes making sure there are 3-4 eyes. Let them harden off in a warm place for a few days. The eyes may start to sprout. That is okay. Once the cut edges of the potatoes are dry fill the pot about 1/4 full of soil and place your cut pieces about six inches apart around the whole surface. Cover the pieces with two inches of soil. Keep the soil moist and fertilize well during the growing season with fish meal. As the plants grow continue to add soil leaving a few leaves sticking out at the soil surface. Continue this until you reach the top of the container. The plants will flower and then begin to fade. When the foliage is turning yellow and dying back it's time to harvest. You can harvest potatoes from the bottom of the pot during the late growing season while the plant leaves are still green. These will be the first to mature and will be large enough to harvest as 'earlies'. To do this you will need to cut out the bottom of the container.


No digging required. Just dump over your container and sift through to find treasures galore! I have heard of gardeners using large garbage bags and large garbage cans to grow potatoes too. I re-used nursery pots that I saved from large plants I've purchased.

Next year I will plant more potatoes. These were fingerlings but I want to plant a variety that I can store over the winter. If you have had a successful experience with a storing variety please tell me about it!

Friday, October 28, 2011

Wine Time - Our First Vintage

Last autumn we took the leap. We hitched up the trailer and headed east to take delivery of 525 pounds of Cabernet Franc grapes. Sourced from Dineen Vineyards in Prosser, Washington we were confident they were of top quality.

A year later. The reward of hard work and patience.
It took a full day to drive the four hour round trip, have the grapes crushed for us and unload the bounty at home. We had fantasized about crushing our own by hand but thankfully reality won out.

Harvested that morning from the scenic Dineen Vineyard and waiting for us when we arrived.


Scott Greer at Sheridan was kind enough to work us into the crush that morning.
We then proceeded to measure the brix and the Ph.


Brix is a measure of the sugar level of the grape. This is how vineyard managers determine when to harvest. Measuring the Ph gives you an idea of the acid content of the juice.


Fermentation took place in the garage with some added heat to keep the yeast happily eating the sugars converting them into alcohol.


Punching down the cap had to be done twice a day for 10 days.
Once the yeast is done converting all the sugar and the acid is balanced out it's time to separate the skins from the juice. We decided to do a 'free run' and then press.


Free run juice going into the carboys to let the solids sink to the bottom. We then moved juice from one carboy to a clean one, removed the sediments and did the same for the remaining ones until the wine was clear and ready for bottling.


Our bottles were recycled so we needed to wash and sanitize them. This took a full day of family labor. Once sanitized in the kitchen they were filled and corked in the garage. Each carboy was taste tested before bottling and labeled as A, B or C grade according to us then laid down in the cellar.


We paid labor in wine and still had plenty to spare!

A year later, we have re-graded. The 'A' became 'B' and vice versa. 'C'  has remained the same.

Monday, October 3, 2011

2nd Quarter Report

Here we are already in October and overdue for my quarterly report. A little foreshadowing to the story of the past few months. We have been busy; with chickens, keeping the garden healthy, watered and growing, mending fences, adding gutters to the coop, laying more flagstone, canning, pickling, and stuffing sausage. Throw in a few vacations, some cycling and soccer and before you know it months have slipped by.


Our vegetable garden was pretty much a bust. Cucumbers and potatoes were our best crops. The summer and patty pan squash would have been better put to use as a source of blossoms to be stuffed. The brussel sprouts are far behind but if our weather stays mild we may get a bumper crop. The blueberries suffered most and I'm wondering if this has anything to do with the dwindling bee population as we only got four berries! If so, that will be remedied this coming spring when I install two top bar bee hives. I will be planting a cover crop of crimson clover in both raised beds that should bloom in April giving the bees a good source of nectar and pollen early in the season. Other sources nearby are winter blooming heather, native flowering currant, sweet box, big leaf maple and salal. In the backyard I am also planting a hillside of lavender for summer nectar among all the other blooming plants at that time of year. I'll fully chronicle the event for you.


I grew potatoes in containers instead of the raised beds to conserve space. All you need is some sort of container, even a garbage can with holes punched in the bottom for drainage will do. I've even seen heavy duty plastic garbage bags used. Put a little soil in the bottom of the container with the seed potatoes. Then as the green tops grow add more soil to cover the stems continuing this practice all the way up to the top of the container. Potatoes will form from roots sent out all the way up the stem of the plant. In the fall when the leaves and stems begin to yellow tip over the container and harvest the potatoes.


With the added nutrients of chicken manure our grape grew with vigor. In its second year, we can now tie and train it to a pre-installed support. Next spring we will lay down some black rock as a mulch to conduct heat and create a micro climate. I'm looking forward to the year we will actually harvest our first bunch.


The hens continued to lay five eggs a day during the summer and once in a while there would be six. Now in October we are getting four a day and sometimes only three. One of our gals is waiting until 3 o'clock in the afternoon to perform her duty. We have decide not to provide artificial light this first winter to give the girls a rest. We won't have any eggs to give away but I'm sure we'll get enough to keep us happy.

An herbs and eggs parting gift for dinner guests. I had to use store bought chives as mine were not yet ready to harvest.


This autumn we are planning a wood-fired oven and cold-smoke house installation. We made some of our own fresh sausage to perfect the stuffing process in order to be prepared once the smoking process comes into the picture. The fresh sausage has to be eaten or frozen and the mix needs to have additives if it is to be smoked. I will be chronicling this as well.

Fresh Italian pork sausage.
Even with shorter days, heavy rain, and cooler temperatures there is still plenty to keep us busy. Ordering bee packages and hives, overseeing the installation of the bread oven and cold-smoke house, sowing cover crops and ordering seeds for next spring. The consummate optimist, I still hold out hope for evenings in front of the fire with a good book and maybe a short vacation to warmer climates.

Monday, September 12, 2011

Harvesting Madrone Bark for Culinary Uses


So why would I display a picture of rose hip marmalade on a post about Madrone bark harvesting? Below you'll find my secret ingredient made from the bark of the Madrone (Arbutus mensiesii). All too common in the Pacific Northwest, I need not introduce it to those who live here but how many of us knew that the tree has culinary uses? Many Native Peoples used it to make tea and dried the berries to use in cakes during the long winter months. As of late the bark has shown up on the Herbfarm menu for their Spring Foragers dinner of where I had the pleasure of celebrating my birthday.


The Pacific Madrone can be found from British Columbia to Baja California. A broadleaf evergreen that sheds it's bark in late Summer and produces berries from Spring blooms in the Autumn, can be used in culinary dishes that require tannin to balance high acids. A tea can be made and used to infuse a depth into foods that can benefit from another layer of flavor such as stews and soups. 


I have two small Madrone in my backyard of which I am harvesting the bark to store for use throughout the year. I used the bark to make a tea. It has a lovely mellow earthy flavor and beautiful reddish brown hue. Making the tea is easy and like any other tea you can steep it as long as you like for a stronger, more concentrated taste.

For 4 cups of tea boil 2 cups of bark "scrolls" until desired tea strength is reached. Pour through a sieve to clarify.
I used this to add liquid, balance the acid, add tannin and flavor depth to my Rose Hip Marmalade.

Rose hips are mostly seeds. It will take you about 45 minutes to 1 hour to clean the hips for the recipe below.
7 cups of cleaned rose hips chopped (mine were from Rugosa roses). They should look like this if you use a food processor to chop the cleaned hips.


2 cups washed and de-stemed hips run through a Kitchen Aid (or similar) food mill. This will cut down on cleaning time too! This will create a mash. 

I processed some of the hips to create a mash to suspend the chopped pieces.
5 cups of sugar
4 cups Madrone Bark Tea
2 medium lemons juiced and zest the rind into small strips

Mix together chopped and milled rose hips and lemon rind strips


Follow the Ball Complete Book for Home Preserving recipe for Marmalade using the Madrone bark tea as a substitute for liquid.


The result is a bright citrusy mouthful calmed by tannic earthy notes. Madrone bark has other uses too only limited by your imagination. I've seen it used in ice cream, sauces, to make Chinese tea eggs, and is a suitable wood for smoking meats. If you've experimented with Madrone bark or Madrone wood let me know what you've made and how you made it.

Monday, August 15, 2011

The Salal Harvest and What to do With It

Yummy biscuits and jam! Learn how to make salal jam in the recipe below.

On our third-of-an-acre we are blessed with an abundance of salal, the Pacific Northwest Native American's word for Gaultheria shallon, an evergreen ground cover found abundantly in the Pacific Northwest. Our largest clump, a 10x15 rectangle, has already, by August 15th, produced enough berries to produce 12 pints of jam and there are plenty more berries to ripen during September. 


The berries hang under the shade of thick leaves and ripen from August through September. Harvesting small batches and freezing allows you to gather berries at their peak before Pacific Northwest drought-like summers turn the plump berries into mummies. Once our berries started to ripen it only took two weeks to gather enough to process.


The berries resemble blueberries and have a similar taste. Slightly blander and less sweet, salal berries are much more earthy and slightly "smokey". We combined two different recipes to come up with our own, and in our opinion, a superior one.


Because we do so much cooking, canning, and processing we purchased the Fruit and Vegetable Strainer attachment for our Kitchen Aid which was the perfect tool for processing the salal berries. When harvesting the berries it is very difficult to extract them from the bush without the small stem so in the interest of saving time we just left them on and processed them in that state (see the previous picture). Juice and pulp out one end, stems, skins, and seeds out the other!


As you can see in the picture above some seeds and skin go through the extractor and you are left with a thick juicy mixture. Because we wanted jam, not jelly, we added a little water to the "waste" product, reboiled it and put it through the processor again to get all the tannins and nutrients from the berry skins. This made our jam a deep black/purple color and posses a wonderful texture. salal berries are high in pectin so some recipes don't add it. Others add apple juice for sweetener instead of sugar and add pectin. Because we added extra water during the second extraction process we decided to add sugar and pectin to insure setting. 

24 cups of salal berries
1 cup sugar or to taste
1/4 cup lemon juice
1 pkg pectin

Run salal berries through a mechanized strainer/sieve. Set aside. Put cast-offs (waste) in a sauce pan and add 2-3 cups water. Bring to a boil for 2 minutes. Run mixture through strainer/sieve and add pulp to original juicy pulp. Discard "waste" product (or feed to the chickens). Bring juicy pulp, sugar, lemon juice and pectin to a boil, stirring constantly to prevent burning, for 1 minute until sugar and pectin are dissolved. Can jam according to standardized methods.

It's as easy as that!

Once all the berries are harvested from your salal it's time to trim up the plants to keep them tidy. You may be able to find a buyer for those lovely leafy stems which are used by the florist industry. Call around to your local florist or farmers market flower vendor. 

Other uses for the leaves come to us via our Native Americans who used the plants medicinally. Here are a few ways they used these useful plants. The berries are said to be an appetite suppressant, the leaves have an astringent affect and are a natural anti-inflammatory and have anti-cramping abilities.

Wikipedia says this "By preparing the leaves in a tea or tincture one can take the herb safely to decrease internal inflammation such as bladder inflammation, stomach or duodenal ulcers, heartburn indigestion, sinus inflammation, diarrhea, moderate fever, inflamed / irritated throat, and menstrual cramps. A poultice of the leaf can be used externally to ease discomfort from insect bites and stings.
Wikipedia refernces Michael Moore, Medicinal Plants of the Pacific West, illustrated by Mimi Kamp, published by Red Crane Books, Inc.


Thursday, August 4, 2011

A Salty Tale


Summer brings around my vacation sojourn out to the Olympic Peninsula. I love the diversity of the area. Mountain, lake and sea converge into one Pacific Coast playground. While relaxing on the shores of Spencer Lake I browsed a book, "The One-Block Feast". I found many of the types of things we are trying to accomplish here on our third-acre lot. One that I had never considered was harvesting the sea for my own sea salt. So I seized the opportunity of being close to Puget Sound waters, away from the large ports and favorite boater's coves, and gathered two gallons of sea water from Case Inlet between Allyn and Grapeview.

I strained the first water through a sieve to remove any large particles. I then boiled it for 20 minutes to kill any bacteria, then filtered the brine to remove any other particles. I also referred to charts from studies of shellfish of the area where the water was taken for heavy metals. Safety first!


Working in 3 cup batches, I used a ceramic casserole in a 400 degree (convection) oven to evaporate the brine, leaving salty crystals behind. I then used a metal spatula to scrape the bottom and sides to release the crystals.


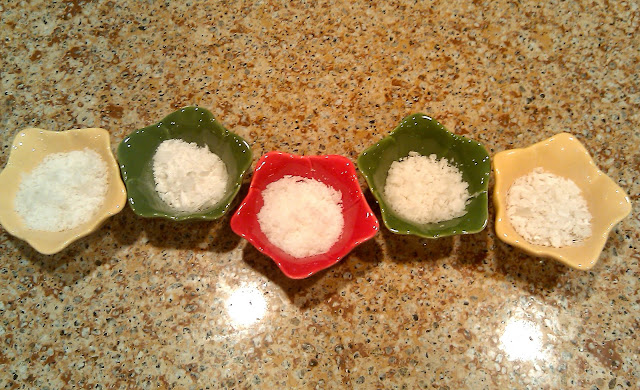
As the brine gets near being completely evaporated you'll need to watch it carefully so as not to burn it. I found that removing the dish just before the salt was completely dry and then letting it finish outside the oven gave the salt a flaky texture. If you leave it too long in the oven it will turn a cream color and be powdery once scraped from the dish. Also, it will be a chore to remove. I yielded 1 1/2 cups of salt for the two gallons of water collected.

Why go to all this trouble making my own sea salt. First and foremost, to educate myself on the abundance of my local environment. Salt is essential to life. Sea salt has the added benefit of containing trace minerals and, as a bonus, tastes better than processed table salt. I'm learning to live locally and as much as possible be self sufficient. It's called Locavorism.