Monday, September 12, 2011

Harvesting Madrone Bark for Culinary Uses


So why would I display a picture of rose hip marmalade on a post about Madrone bark harvesting? Below you'll find my secret ingredient made from the bark of the Madrone (Arbutus mensiesii). All too common in the Pacific Northwest, I need not introduce it to those who live here but how many of us knew that the tree has culinary uses? Many Native Peoples used it to make tea and dried the berries to use in cakes during the long winter months. As of late the bark has shown up on the Herbfarm menu for their Spring Foragers dinner of where I had the pleasure of celebrating my birthday.


The Pacific Madrone can be found from British Columbia to Baja California. A broadleaf evergreen that sheds it's bark in late Summer and produces berries from Spring blooms in the Autumn, can be used in culinary dishes that require tannin to balance high acids. A tea can be made and used to infuse a depth into foods that can benefit from another layer of flavor such as stews and soups. 


I have two small Madrone in my backyard of which I am harvesting the bark to store for use throughout the year. I used the bark to make a tea. It has a lovely mellow earthy flavor and beautiful reddish brown hue. Making the tea is easy and like any other tea you can steep it as long as you like for a stronger, more concentrated taste.

For 4 cups of tea boil 2 cups of bark "scrolls" until desired tea strength is reached. Pour through a sieve to clarify.
I used this to add liquid, balance the acid, add tannin and flavor depth to my Rose Hip Marmalade.

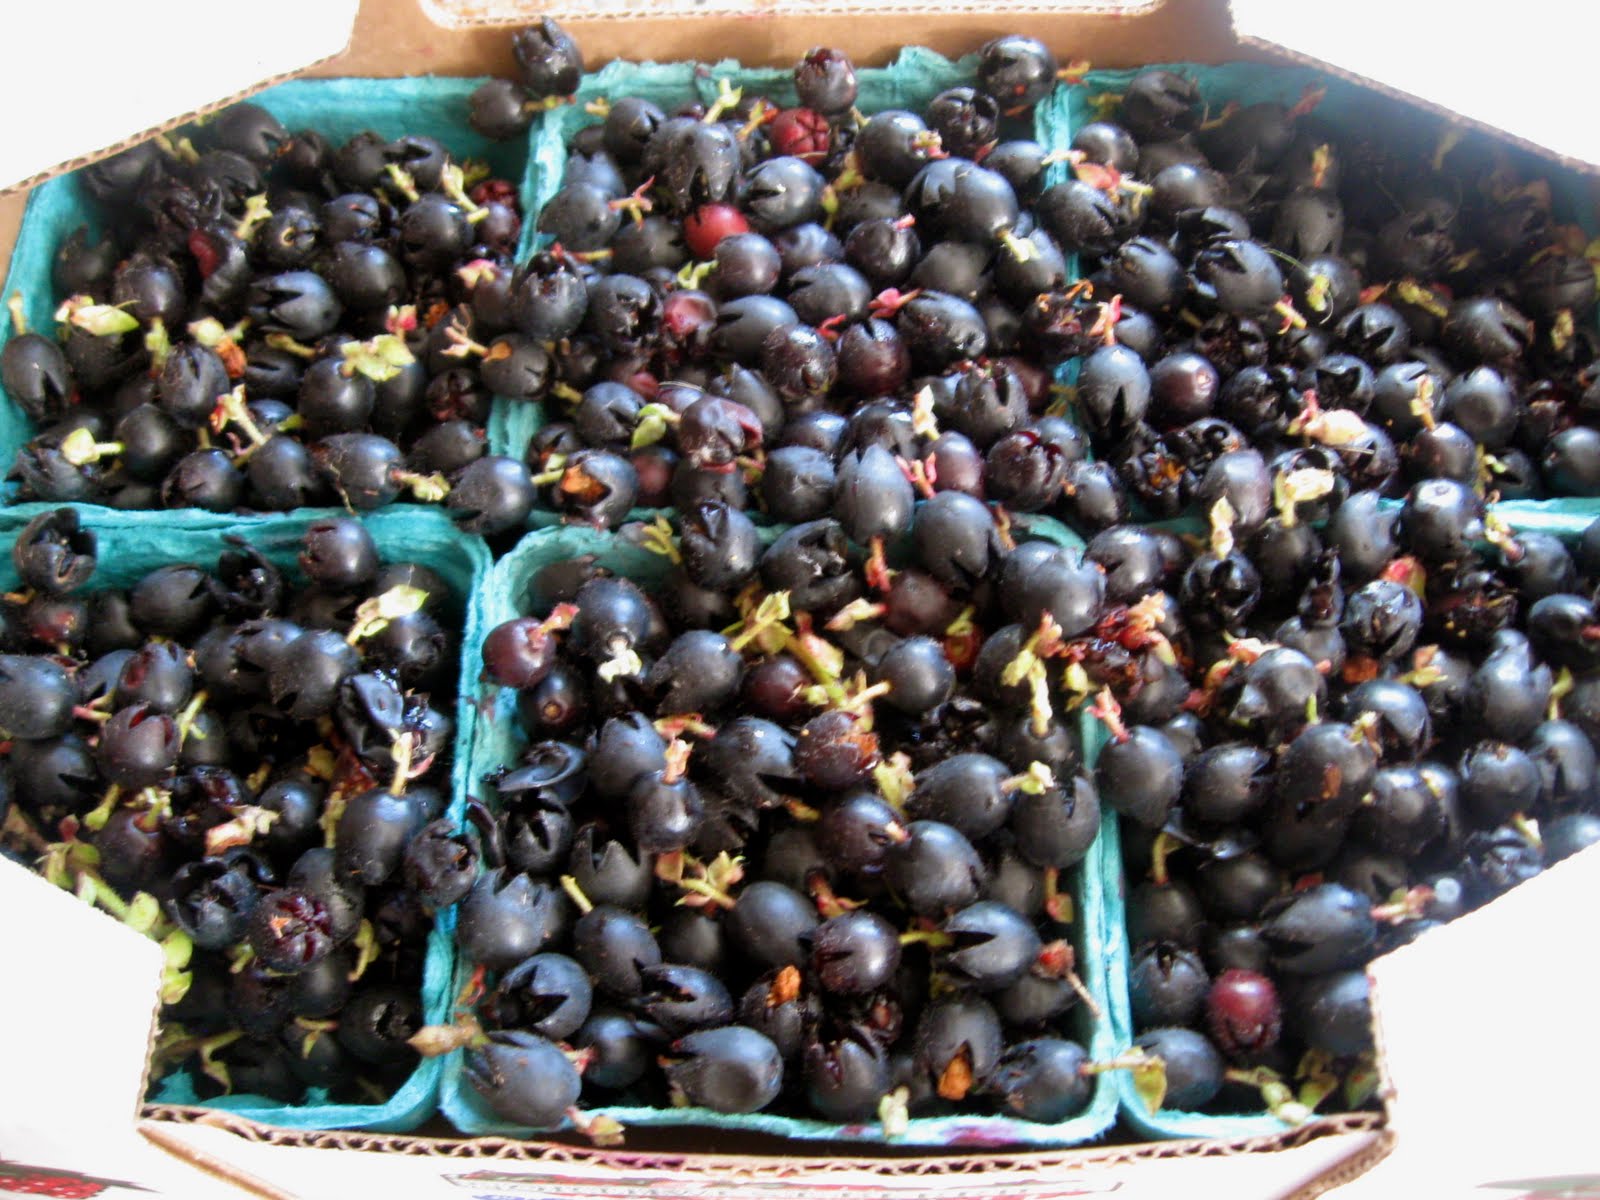
Rose hips are mostly seeds. It will take you about 45 minutes to 1 hour to clean the hips for the recipe below.
7 cups of cleaned rose hips chopped (mine were from Rugosa roses). They should look like this if you use a food processor to chop the cleaned hips.


2 cups washed and de-stemed hips run through a Kitchen Aid (or similar) food mill. This will cut down on cleaning time too! This will create a mash. 

I processed some of the hips to create a mash to suspend the chopped pieces.
5 cups of sugar
4 cups Madrone Bark Tea
2 medium lemons juiced and zest the rind into small strips

Mix together chopped and milled rose hips and lemon rind strips


Follow the Ball Complete Book for Home Preserving recipe for Marmalade using the Madrone bark tea as a substitute for liquid.


The result is a bright citrusy mouthful calmed by tannic earthy notes. Madrone bark has other uses too only limited by your imagination. I've seen it used in ice cream, sauces, to make Chinese tea eggs, and is a suitable wood for smoking meats. If you've experimented with Madrone bark or Madrone wood let me know what you've made and how you made it.

Monday, August 15, 2011

The Salal Harvest and What to do With It

Yummy biscuits and jam! Learn how to make salal jam in the recipe below.

On our third-of-an-acre we are blessed with an abundance of salal, the Pacific Northwest Native American's word for Gaultheria shallon, an evergreen ground cover found abundantly in the Pacific Northwest. Our largest clump, a 10x15 rectangle, has already, by August 15th, produced enough berries to produce 12 pints of jam and there are plenty more berries to ripen during September. 


The berries hang under the shade of thick leaves and ripen from August through September. Harvesting small batches and freezing allows you to gather berries at their peak before Pacific Northwest drought-like summers turn the plump berries into mummies. Once our berries started to ripen it only took two weeks to gather enough to process.


The berries resemble blueberries and have a similar taste. Slightly blander and less sweet, salal berries are much more earthy and slightly "smokey". We combined two different recipes to come up with our own, and in our opinion, a superior one.


Because we do so much cooking, canning, and processing we purchased the Fruit and Vegetable Strainer attachment for our Kitchen Aid which was the perfect tool for processing the salal berries. When harvesting the berries it is very difficult to extract them from the bush without the small stem so in the interest of saving time we just left them on and processed them in that state (see the previous picture). Juice and pulp out one end, stems, skins, and seeds out the other!


As you can see in the picture above some seeds and skin go through the extractor and you are left with a thick juicy mixture. Because we wanted jam, not jelly, we added a little water to the "waste" product, reboiled it and put it through the processor again to get all the tannins and nutrients from the berry skins. This made our jam a deep black/purple color and posses a wonderful texture. salal berries are high in pectin so some recipes don't add it. Others add apple juice for sweetener instead of sugar and add pectin. Because we added extra water during the second extraction process we decided to add sugar and pectin to insure setting. 

24 cups of salal berries
1 cup sugar or to taste
1/4 cup lemon juice
1 pkg pectin

Run salal berries through a mechanized strainer/sieve. Set aside. Put cast-offs (waste) in a sauce pan and add 2-3 cups water. Bring to a boil for 2 minutes. Run mixture through strainer/sieve and add pulp to original juicy pulp. Discard "waste" product (or feed to the chickens). Bring juicy pulp, sugar, lemon juice and pectin to a boil, stirring constantly to prevent burning, for 1 minute until sugar and pectin are dissolved. Can jam according to standardized methods.

It's as easy as that!

Once all the berries are harvested from your salal it's time to trim up the plants to keep them tidy. You may be able to find a buyer for those lovely leafy stems which are used by the florist industry. Call around to your local florist or farmers market flower vendor. 

Other uses for the leaves come to us via our Native Americans who used the plants medicinally. Here are a few ways they used these useful plants. The berries are said to be an appetite suppressant, the leaves have an astringent affect and are a natural anti-inflammatory and have anti-cramping abilities.

Wikipedia says this "By preparing the leaves in a tea or tincture one can take the herb safely to decrease internal inflammation such as bladder inflammation, stomach or duodenal ulcers, heartburn indigestion, sinus inflammation, diarrhea, moderate fever, inflamed / irritated throat, and menstrual cramps. A poultice of the leaf can be used externally to ease discomfort from insect bites and stings.
Wikipedia refernces Michael Moore, Medicinal Plants of the Pacific West, illustrated by Mimi Kamp, published by Red Crane Books, Inc.


Thursday, August 4, 2011

A Salty Tale


Summer brings around my vacation sojourn out to the Olympic Peninsula. I love the diversity of the area. Mountain, lake and sea converge into one Pacific Coast playground. While relaxing on the shores of Spencer Lake I browsed a book, "The One-Block Feast". I found many of the types of things we are trying to accomplish here on our third-acre lot. One that I had never considered was harvesting the sea for my own sea salt. So I seized the opportunity of being close to Puget Sound waters, away from the large ports and favorite boater's coves, and gathered two gallons of sea water from Case Inlet between Allyn and Grapeview.

I strained the first water through a sieve to remove any large particles. I then boiled it for 20 minutes to kill any bacteria, then filtered the brine to remove any other particles. I also referred to charts from studies of shellfish of the area where the water was taken for heavy metals. Safety first!


Working in 3 cup batches, I used a ceramic casserole in a 400 degree (convection) oven to evaporate the brine, leaving salty crystals behind. I then used a metal spatula to scrape the bottom and sides to release the crystals.


As the brine gets near being completely evaporated you'll need to watch it carefully so as not to burn it. I found that removing the dish just before the salt was completely dry and then letting it finish outside the oven gave the salt a flaky texture. If you leave it too long in the oven it will turn a cream color and be powdery once scraped from the dish. Also, it will be a chore to remove. I yielded 1 1/2 cups of salt for the two gallons of water collected.

Why go to all this trouble making my own sea salt. First and foremost, to educate myself on the abundance of my local environment. Salt is essential to life. Sea salt has the added benefit of containing trace minerals and, as a bonus, tastes better than processed table salt. I'm learning to live locally and as much as possible be self sufficient. It's called Locavorism.